Basics of JCapPM's position map window
The special feature of JCapPM is certainly the assignement of geographic positions of photos to a map. In order to use it easily, you should know about the different position point types, some interesting options and the context menu which are described in the following sections.
Since JCapPM v4.4 you can geotag your photos easily by using Google Earth. However, if you want to see the map without connecting each time to Google Earth you may download a map from Google Maps with JCapPM.
Last but not least you may also use your own scanned maps (or plans, schemes, diagrams etc.) as I did for this documentation.
You open the position map window by clicking 
Point types 
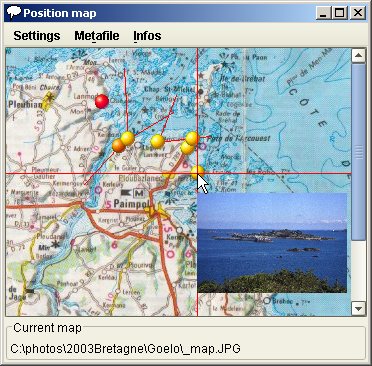
Position points are shown normally as  . If the actually shown photo has a position point then its point looks like . If the actually shown photo has a position point then its point looks like  and it is called "current point". Click somewhere on the map to define a new position which is represented as and it is called "current point". Click somewhere on the map to define a new position which is represented as  . This point is called "cursor point". . This point is called "cursor point".
When one hovers with the mouse over a position point then a tooltip pops up and shows the corresponding image:
Clicking a point may result in different actions, dependent of your settings in the Options dialog (see Options dialog.)
Some position points may have exactly the same position as other points and hide them therefore. Such points are called "multi-points". If the current point is the top most point of multi-points then a click on it will bring up the next point of this position to the top.
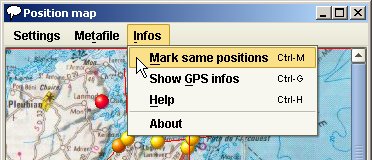
Multi-points may be marked as  by selecting "Mark same positions" (shortcut Ctrl-M) in the Info menu: by selecting "Mark same positions" (shortcut Ctrl-M) in the Info menu:
When you click on a multi-point then the top most multi point will be the current point, independent of your setting in the options dialog (see Options dialog section 4 ). This simplifies to iterate over multi points.
New in version 2.0 is the reference point  which represents a longitude/latitude to define by the user. For more details about using GPS with JCapPM follow the link please. which represents a longitude/latitude to define by the user. For more details about using GPS with JCapPM follow the link please.
Since version 2.0 the cursor point shows its x/y and lon/lat position as tooltip if the map was already calibrated.
Options dialog
You open the Options dialog by clicking on:
...and here is it:
Section 1 allows to hide or to show position points and their associated areas or lines of views. This may be helpful if a position point hides a part of the map you want to see.
If your map has been calibrated you may show the reference point and, if you have imported a route track, you may show or hide it too.
As you saw in the screenshot of the overview page, the cursor point is exactly over the point of the current image. This is because I've selected in Option dialog "cursor default position: image position" (see 2 ).
If you want to associate a serie of photos to exactly the same position then select "cursor default position: last position". Verify that "when going to another image: save current point" is selected too (see 3 ). Each click on next or previous will save then that position for the current photo.
JCapPM iterates through all photos and subfolders of a folder. When you jump to another photo (or subfolder) JCapPM writes the meta file(s) of the current photo in its folder. Concerning the mapInfo meta file, which stores the position of a photo, you can adapt this behaviour in the Option dialog (see 3 ). Either JCapPM saves or deletes the current point or does nothing.
Clicking a point may result in different actions, dependent of your settings in the Options dialog (see 4 ). Either you center the cursor point on it or/and you go to that image or nothing is done.
You may want to be asked when a position point is going to be saved or deleted. Just select the option(s) you prefer (see 5 ).
The elementary part of JCapPM is the map! You have to declare the name for your map image in the Options dialog (see 6 ). This is just the file name of your map image. This implies that all map images have to have the same file name!
Context menu
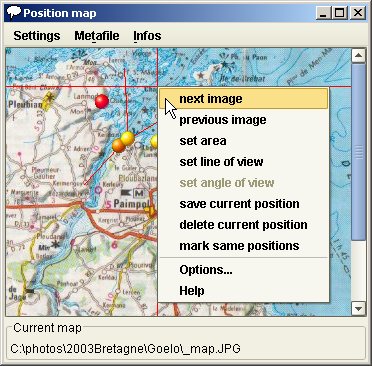
Make use of the context menu (right click on Windows machines) in order to go to the next and previous photo. This is more comfortable because the position map keeps the focus (and not the main JCapPM window).
Furthermore the context menu enables you to make areas and lines or angles of view: place first the cursor point anywhere on the map and open then the context menu where you want to end your area or line of view. Select then "set area" (or line/angle).
Last but not least the context menu may be a shortcut for some other actions as you can see.
Google maps
Until version 4.0 you had to capture or to scan a map manually in order to use it with JCapPM. If you wanted to use it with real GPS datas (longitude/latitude) you had still to calibrate the map (see here for a tutorial).
Now, things are much more easier! JCapPM can download an already calibrated map from google maps server. You just need to connect to JCapPM's homepage, select the map you want, save it there and download it by JCapPM. Let me show you step by step how it works:
Open the position map window and click the following menu entry:
It opens the follwing panel:
If you select "show position points" you'll see on JCapPM's homepage a link allowing you to show exactly the map area in which fit all position points. Of course, this is only possible if your photos have been already associated to position points as you can do by importing a GPS tracklog (even if you have not yet a map).
If you don't have yet any position points, you will need to zoom & move to the right map area in which you are interested on JCapPM's homepage.
When you click the link "JCapPM's homepage" a browser window opens and you'll see something like that:
You may resize, zoom out/in, move the map or change its type (normal, satellite, hybrid) as you like. After resizing the map you need to click "show position points" (if available) in order to center the map anew according your position points.
When you are happy with the map, click the link "save map", wait to see a confirmation message and return to JCapPM.
In JCapPM click the button "Download map" and some seconds later you'll see the map in JCapPM. If your photos have been already associated to position points, they appear automatically on the map.
|