Tutorial PositionMap/JCapPM for Standard and Dynamic map template
The aim of this page is to show step-by-step how to create a html photo album with JAlbum skin PositionMap and with its integrated tool JCapPM. In order to keep it simple I changed as few as possible default values.
PositionMap allows to use different templates (see here for more details). This tutorial covers only 2 of the 4 templates (standard and dynamic map). As these templates need a map image in opposite to the other two templates (google maps and no-map), album preparation requires more work which is described in this tutorial too.
If you want to create a Google Maps album, please refer to the second tutorial.
1. Installing the software
1.1 Installing PositionMap
Once JAlbum installed on you computer copy the content of the downloaded skin PositionMap in the skin folder of JAlbum:
2. Building the album structure
2.1 Create a root map
You have taken photos from various locations on a map. The area (large) map will reside in the "root folder" of your choice. In my example the root folder is "c:\photos\2003Bretagne".
Create your map file and name it "_map.jpg" in the root folder. If you want to use a map from google maps you may use JCapPM's new google maps feature.
You can place photos in the root folder to appear on the area map as well.
2.2 Create subfolders and sub maps
The area may be further broken down into "local areas" which are placed in subfolders below the root folder, each one with a local map and photos that will appear on the local maps. Create local map files (each named "_map.jpg") in each subfolder.
In my example my root folder doesn't contain photos (apart from the map file) but 3 subfolders:
3. Setting up JAlbum
3.1 Define album input and output folder
Open JAlbum. Choose skin "PositionMap" and your prefered style sheet.
Change the "Image directory" to point to your album root folder. Change the "Output directory" to where you want to have created the html album. I recommend that "Output directory" is different than "Image directory".
4. Setting up PositionMap
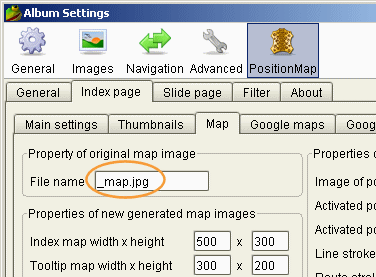
4.1 Verify map file name
Switch to the PositionMap tab and then to the tab "Index page" and "Map". Just verify that the names of your map files created in step 2 are the ones defined here (adapt the name if needed):
4.2 Verify file exclusion pattern
It's important that map file names start with an underscore because they have to be excluded from JAlbum's normal image generating process else you would see them within thumbnails and slide images.
Excluding is achieved by using JAlbum's exclusion pattern. PositionMap sets it per default to the following:
(\.|_).*
This pattern excludes files or folder beginnig with _ or .
Here is a screenshot where you can find this setting if you need to adapt it:
4.3 Launch JCapPM
In PositionMap's GUI switch to tab "General" and press the "Launch JCapPM" button.
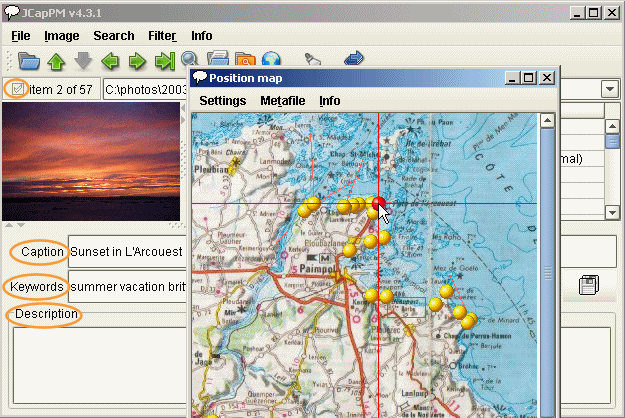
It opens to show the first item (photo or subfolder) of the root folder. As my first item is a folder (Goelo) containing a map, JCapPM displays the map in its main window:
Depending on what the item is, one of four things will appear in the main window:
- a map image (for subfolders that have a map file inside), or
- a folder icon (for subfolders that don't have a map file), or
- a photo, or
- an icon for an non-image file (pdf, zip, ...)
5. Setting up JCapPM
5.1 Verify map file name
It's important that JCapPM knows the file name of your map. Dependent on your operating system (Windows, Linux, MacOS...) it might be case sensitive. The default name for JCapPM and PositionMap is "_map.jpg" but you can change it.
To adapt the map file name open the PositionMap window by clicking  on the toolbar or just press the hot key Ctrl-W. Then go to menu "Settings" --> "Options" or just press Ctrl-O. on the toolbar or just press the hot key Ctrl-W. Then go to menu "Settings" --> "Options" or just press Ctrl-O.
Click "Apply and save settings".
6. Creating positions and areas on map
6.1 Set position points
In the main window of JCapPM you see the current item (in my case the map of the subfolder "Goelo"). In the Position map window you see the the map of the root folder ("2003Bretagne"). Use the crosshairs to place a red dot on the map in order to set a position point which will indicate the position of "Goelo":
6.2 Set position areas
If you want to have an area instead of a point, open the context menu in the opposite corner of the area to create (right-click on Windows machines):
Select "set area" in the context menu.
Either reopen the context menu of the Position map window and select "next image" or press Next button  on the main toolbar (keep the Position map window open). The position point/area is automatically saved (you can change this behaviour in the Options dialog which is shown above). on the main toolbar (keep the Position map window open). The position point/area is automatically saved (you can change this behaviour in the Options dialog which is shown above).
Repeat this step for each item in the current folder for which you want to have a position point/area.
Hint: Since JCapPM v4.4 you can use Goolge Earth for geotagging your files. For more information read on here please.
7. Traversing all subfolders
7.1 Traversing subfolders
Step into a subfolder by clicking the Down arrow on the toolbar  . Set position points for items in this subfolder by repeating step 6. . Set position points for items in this subfolder by repeating step 6.
In my example, when I step into subfolder "Goelo", the main window of JCapPM shows the photos in folder "Goelo" and the Position map window shows the map in folder "Goelo":
As I marked on the screenshot you see if the photo is included in or excluded from the album (un/selected checkbox). The checkbox is disabled because JCapPM only read this information in order to not interfere with JAlbum, which manages in- and exclusion of photos itself.
Optional: Add captions, keywords or descriptions
You may add a Caption, Keywords or a Description to a photo or subfolder.
- Captions may be used while album generation for creating labels for photos/subfolders.
- Keywords allow to categorize and to find photos with JCapPM.
- Descriptions for photos may be shown on slide pages of the album.
Descriptions of folders may be show on index pages (see example).
All meta information are automatically stored in separate text files being in the same folder as the photos and the subfolders. Metafile names are simply composed by the name of the associated photo (or subfolder) and an extension as the following screenshot of my album structure shows:
You remark that the photo "132.JPG" has a caption (.txt), a description (_description.txt) and a position on a map (_mapInfo.txt).
Repeat these steps until all photos are "mapped" and "labeled". Close JCapPM.
8. Generating the album
8.1 Generate the album
In JAlbum, click the "Make album" button (in the main window) and when it's finished, click "View album".
Congratulations, you are done!
|